Including: |
    Future
Craft Lesson Pictures Future
Craft Lesson Pictures |
Including: |
|
Future
Craft Lesson Pictures |
|
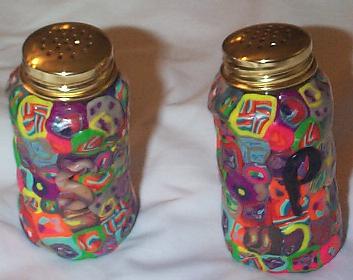
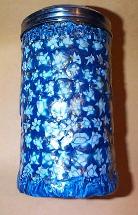
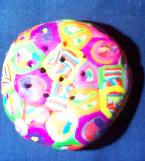
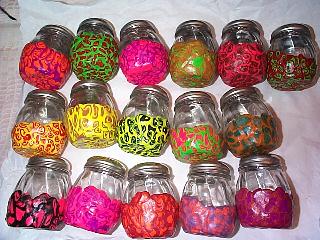
POLYMER CLAY ON GLASS PAGE 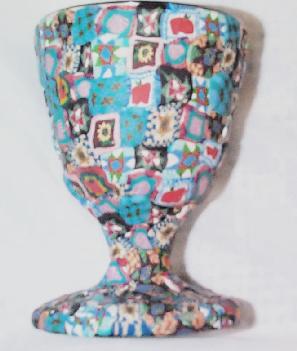 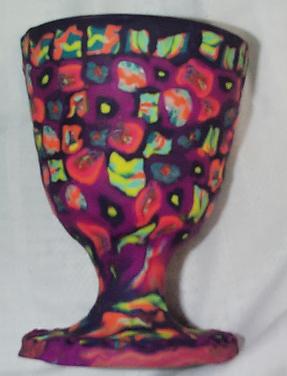 Many glass objects can be covered with polymer clay and then baked in the oven. Many are for both decorative and useful items. I have baked Sculpey, Friendly Clay and other Polymer Clay onto a variety of glass objects. My friends and students have really enjoyed them. Some objects that can be used are candlesticks, salt and pepper shakers, baby food jars, ash trays to name just a few. I use thick glass but you may want to carefully experiment with others. For many years our favorite camp crafts have been made from clay. First Salt Clay for home made clay we could make into large objects. Then we discovered Sculpey Polymer Clay! The world of adult looking camp crafts began. I have included some of the directions to clay projects on : Some more of Eileen's Clay on Glass projects are included on my Baby Food Jar Crafts. 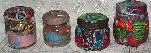 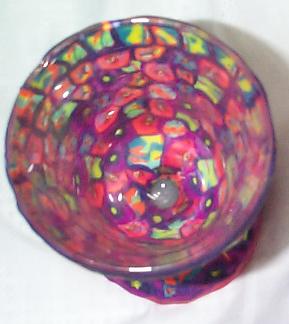 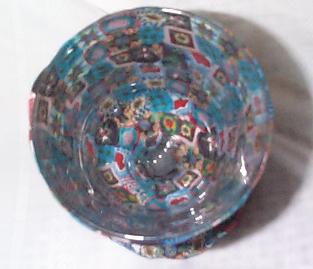 Inside view of Kiddish Cups. They can be used for: See Passover Page for more information and about these goblets. Please remember that polymer clay is not play dough and needs adult supervision. See Eileen's Clay Page for basic polymer clay lessons and ideas. When working with Glass decide what kind of clay techinique you want to use: My favorite technique is using cane slices. Clay rolls/squares can be made by many groups. The teacher then thinly slices them and gives each group or class an assortment. See manufactures suggestions for how thin to slice them. I often slice them 1/4 inch then. I slice them onto sheets of wax paper and then layer sheets inside a covered plastic container. The slices can be used even weeks or months later. When time to share, I take out sheets carefully and place on metal cookie sheets to pass around to students. Students transfer the slices they want onto wax paper they have placed on a foam plate. They then can safely carry back the slices to their table. With little children, I walk around with trays, have them pick their slices and then put them on to their wax paper for them. I also make rules on when they can carefully apply them to their object. Sometimes having younger children wait for teacher or aide to help place them. This cuts down on the children squishing the tiles/slices too flat. I like using multiple canes especially with children but many great and beautiful projects can be made with all of the slices are the same pattern. It is just up to you. Many times I allow the children to take a limited amount of slices at a time. This helps prevent them taking too many for their project and protects the slices from abuse. Slices should be placed next to each other and touching with no empty spaces. When finished covering, roll gently in your hands to smooth the clay and to allow for even thickness. When applying clay to something with a cover make sure to try your cover on before baking. Trim the clay neatly at top to allow the cover to fit back on. Sometimes as in the case of Baby Food Jar Projects, I also cover the cover with clay for a more finished look. So make sure to try on the cover and trim that too if needed. I like to bake all projects on a pryrex container covered with parchment paper. This keeps dust, dirt or other substances from touching the clay from other projects. Do not forget as with all clay or craft projects to mark the child's name somewhere on the project. They often do not recognize their finish art work! Also if you also mark the year, parents love to remember how old their child was when they made this treasure. I use a pointed object or tooth pick to lightly scratch name and date. If baking multiple classes in one day. I mark on parchment paper which class I am baking this helps when it is time to wrap to send home. Some items pictured on my Clay On Glass projects page are offered for sale on my business site: Chadis Crafts and Kippot Sales from that site helps pay for the expenses of my free educational lessons and web pages. But as there are so many people out there asking for directions for these crafts, I am including some of them here for you to see. Hopefully these pictures will inspire you to make your own polymer clay on glass projects. 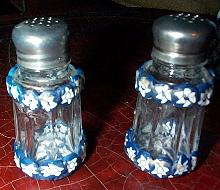 Clay canes on
just part of a glass salt and pepper shaker. |
 Preschool Class I had them play with the terra cotta sculpey sold in 1 3/4 pound boxes. Economical and nice color for bottom. I had soften the clay then rolled through the pasta machine. They love playing with the pasta machine. I covered the bottom with their sheets then carved with a pointy tool their initials for later identification. At this point I have them wash their hands or use hand wipes
to take off the terra cotta color from their hands.
This same technique could be used to make a salt shakker into a Jewish Spice box/bottle called a Havadallah spice box.
Scraps of clay are Rolled into a snake and shaped into an S or P. (Usually Teachers need to do the shaping of the letter after the child makes the snake.)
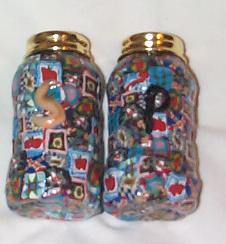
These salt and pepper shakers are made from Friendly Clay Company pre-made cane squares. They are sold in many stores. I have reduced them to a smaller cane. Because this is Friendly Clay, which I find can crumble, I use their special microwave warmer to warm the canes before I reduce and/or slice. These warmers are difficult to find for some reason but are really helpful. You warm a heat pack and then place that into a cloth bag that comes with it. You then place canes in bag and wait. This really helps this product slice smoothly. Scraps of clay are Rolled into a snake and shaped into an S or P. (Usually Teachers need to do the shaping of the letter after the child makes the snake.)
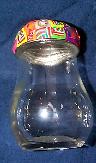
I have made many star candle sticks. I like to place the clay on the bottom of a transparent clear candle stick. This shows the colors but the dripping candle wax can not stick to clay. Clay On Glass Bottle with Metal Cover.
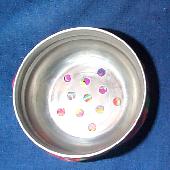
I covered most of the holes and made others smaller as I only needed small holes to let the smell out for Havdallah spices. I also only covered part of the bottle to allow a view of the contents and to show a different technique. Many people cover only a part of a glass object. (Especially on TV programs when they use old Christmas Glass ornments.) 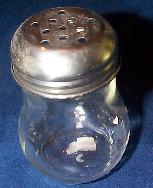
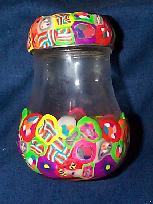
  Sugar or Cheese Shakers or Havdallah Spice Jars To make the above project easier for me to teach to preschool children, I cut a few steps. I gave each student about 1/2 oz of two colors. We had them play with the clay to soften and then rolled out using a copper tube I have in large quanities. We stretched to make the two colors about the same size and placed one on top of the other. Rolling into a "jelly roll" cane. The children rolled them out thinner into a snake like shape about 1/2" wide and teachers rolled them thinner. We cut the canes using the clay safe cutter that is a half moon shape. This is safer to use and leave around young children. Starting from the bottom they carefully places canes next to each other and up the sides. The teachers rolled them thinner. The baking and coating directions same as other projects. Clay on glass and
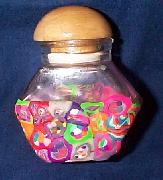
metal.Mini Havdallah set 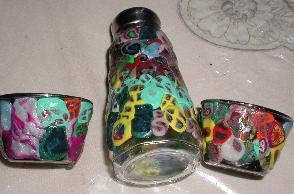 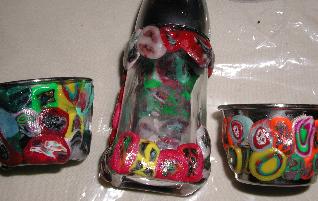 One sauce cup for the wine/kiddush cup and one to hold the havdallah candle. These sets were also made in a preschool class. I did gloss them as in Havdallah you don't drink the wine only use it to put out the flame of the candle so it did not have to be made food safe. The glass of the salt or pepper shaker can be covered with canes totally including bottom or just along the bottom and rim so children can see the spices inside. A found the salt shakers for these at The Dollar Tree Store. The sauce cups were in a set of 4 for $1.00! Clay On Glass Bottle With Wood Cover.
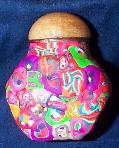
I resisted covering the wooden cover! I liked the wood plus it had a rubber seal that looked like it might not survive my taking it off and on. The seal would be important if I used it for spices. You can cover all or part of the glass. 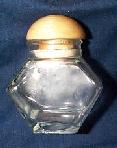
More Havdallah Spice Jars can be seen on my Clay on Glass Sugar Jar
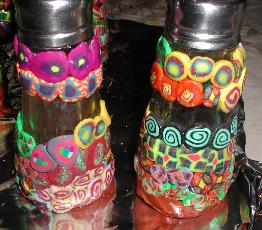
Canes cane be made perfectly but I often like the imperfect or surprise canes. These are the slices you get at the end of a cane after reducing the cane from a large cane. They are often more interesting then the planned cane slices. 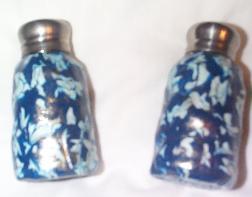 Same cane slices on glass salt and peppers. Sealed with a satin Sculpey glaze that had some gold metallic powder mixed in. |