Including: |
    Future
Craft Lesson Pictures Future
Craft Lesson Pictures |
Including: |
|
Future
Craft Lesson Pictures |
|
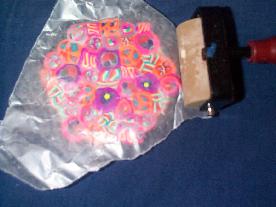
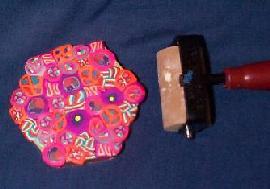
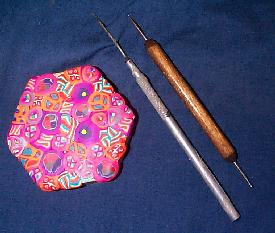
POLYMER CLAY ON PAPER MACHE PAGE 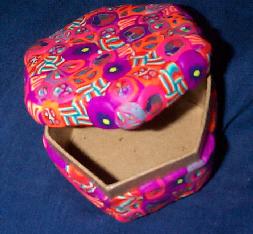 Perfect for Jewelry, Jewish Spice Box (Havdalah), Paper Clip Desk Box etc. Supplies needed: Polymer clay baked on paper mache is a really exciting technique for children and adults. Many commercial paper mache objects can be covered with polymer clay and then baked in the oven. Many are for both decorative and useful items. They come in all sizes from the very small to very large in different shapes including: boxes, pots, bird houses etc For many years our favorite camp crafts have been made from clay. First Salt Clay for home made clay we could make into large objects. Then we discovered Sculpey Polymer Clay! The world of adult looking camp crafts began. I have included some of the directions to clay projects on : Please remember that polymer clay is not play dough and needs adult supervision. Paint with Sobo Craft Glue onto top and bottom of box. Let dry and also cover the insides. This I have been told allows the box to be less porous, adhire to the clay better and protects it. After glue is dried the papermache is ready for your clay. See Eileen's Clay Page for basic polymer clay lessons and ideas. When working with Paper Mache decide what kind of clay techinique you want to use: My favorite technique is using cane slices. Clay rolls/squares can be made by many groups. The teacher then thinly slices them and gives each group or class an assortment. See manufactures suggestions for how thin to slice them. I often slice them 1/4 inch then. I slice them onto sheets of wax paper and then layer sheets inside a covered plastic container. The slices can be used even weeks or months later. When time to share, I take out sheets carefully and place on metal cookie sheets to pass around to students. Students transfer the slices they want onto wax paper they have placed on a foam plate. They then can safely carry back the slices to their table. With little children, I walk around with trays, have them pick their slices and then put them on to their wax paper for them. I also make rules on when they can carefully apply them to their object. Sometimes having younger children wait for teacher or aide to help place them. This cuts down on the children squishing the tiles/slices too flat. I like using multiple canes especially with children but many great and beautiful projects can be made with all of the slices are the same pattern. It is just up to you. Many times I allow the children to take a limited amount of slices at a time. This helps prevent them taking too many for their project and protects the slices from abuse. Slices should be placed next to each other and touching with no empty spaces. When finished covering, roll gently with brayer on wax paper covered clay to smooth the clay and to allow for even thickness. When applying clay to something with a cover make sure to try your cover on before baking. Trim the clay neatly at edges to allow the cover to fit back on. I like to bake all projects in a pryrex container covered with parchment paper. This keeps dust, dirt or other substances from touching the clay from other projects. Do not forget as with all clay or craft projects to mark the child's name somewhere on the project. They often do not recognize their finish art work! Also if you also mark the year, parents love to remember how old their child was when they made this treasure. When making a 2 part project make sure to mark both halves. I like to use permanet markers. If baking multiple classes in one day. I mark on parchment paper which class I am baking this helps when it is time to wrap to send home. |
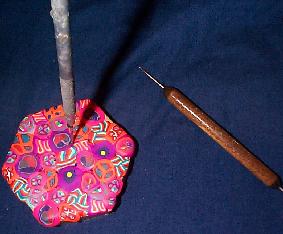
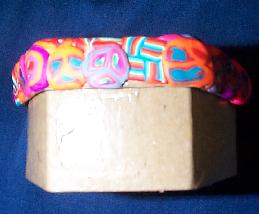
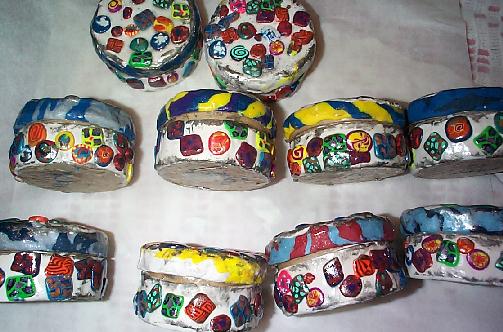
A small six sided box can be used for many things. The pictures below show me punching small holes so to allow smell to come out. This was to make the box into a Jewish spice box used for Saturday night and the end of Shabbath prayers called Havdallah. Smelling the spices are to give you something pleasant to start your week. To see more Havdallah Spice Boxes/Jars, See my babyfood jar crafts.and Clay on Glass Page. For all other projects just don't punch in the holes.  Paper Mache box with Sobo Glue
sealer.
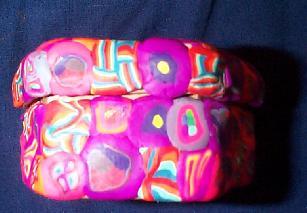
Same Boxes With Sculpey Gloss Glaze and Silver Metallic Powder Painted on Edge.
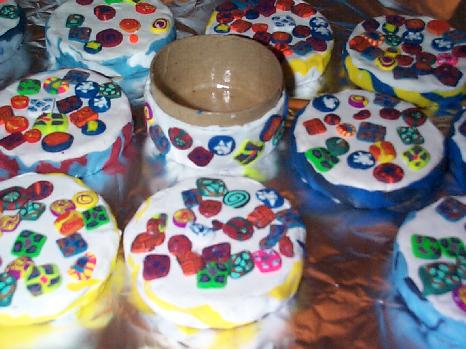
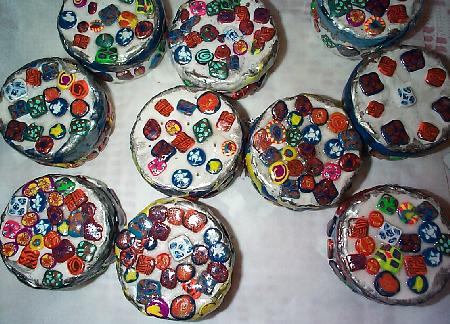
Materials: Some have small holes for use as Spice boxes. This project I taught to a class of 3 and 4 year olds. I did a simplified clay on paper mache box. Actually it meant more work for me. The kids softened the clay and we rolled out sheets with the pasta machine on number 1. I made canes using their sheets. I sliced them at home as I wanted to use a sharp Sculpey slicer and don't want to use it around the kids. (I get side tracked and use it upside down. Could cut something off of my hand!) I also coated the paper mache with the glue as in above project before bringing it to the kids. The kids also softened the white Sculpey and rolled it out in the pasta machine. (They love the pasta machine!)I did this a little each time at the end of 2 classes. At home I sliced the canes and made an assortment on wax paper for each of the kids. I also at home rolled the white clay onto the sides and top of the cover only. These were short classes so had to do some at home. The kids softened two small pieces of left over clay and rolled snakes. They twisted the snakes together and my helper and I put them on the edge for the side of the cover. After they were pressed in place, I gave out the sheets of cane slices. I gave each kid about 40 slices. I told them if they listened and did everything right I would paint a silver edge on it. They DID ! They were told to put only 10 slices gently onto the top. I demonstrated. Did not want them to sqwish or wreck the slice's patterns. They were then told to put the rest on the side where I had placed the white clay. If they had extra I let them put the rest onto the cover. They did great. I took them home to bake and glazed, adding an edge of silver metallic Fimo powder and Sculpey Gloss. Some of the kids wanted to use these for Spice boxes for a Jewish Custom. I used a clay tool to push a small hole into the clay and box before I baked it. I also used the tool to clean the hole of gloss so it would be open. The project was a hit! One Rabbi's son (4 years old) carried it to Temple the next Shabbat to show everyone! To see more clay on paper mache projects click here. |