Including: |
    Future
Craft Lesson Pictures Future
Craft Lesson Pictures |
Including: |
|
Future
Craft Lesson Pictures |
|
Chadis Crafts' Fun Pages POLYMER CLAY PURIM YAD PAGE. Click here to go to Chadis Crafts' Fun Pages for Purim Level= Adult or Teen. (Less if the canes are made for the younger child to use.) 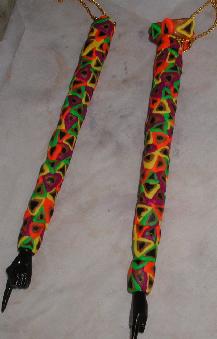 Sculpey Clay On Wooden Yad 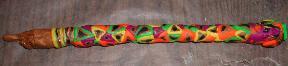 Sculpey Clay on Aluminum Foil Frame A discussion on J-Crafts (Jewish Craft discussion list at yahoogroups.com inspired this craft. I already made a Yad (pointer used to follow along in the Torah or prayer book.) for my son's Bar Mitvah. See my make your own ritual items page. So when the discussion led to silly things etc for adults to make for Purim. I thought of this yad. I used neon color clay on the outside of each triangle. Triangles being a symbol of Purim. I made the inside of the triangle "cane" to be light brown for the cookie part of the Hamantashen and used black for the poppy seeds. Of course you could make different color centers for your favorite "flavor". I suggest you make all of the centers the same color. This will allow the pattern shows even with the neon colors. For those that may not have worked with sculpey and making canes. I added a few more pictures to this lesson. Supplies to make three yads:  Safety Clay Cutter and Clay Gun Safety cutter can not cut you or children but cuts the clay. The clay gun comes with about 15 different templets to shoot out different clay shapes. Round, Triangle etc. To build the canes, in this case triangle shape canes you can build the canes by hand or use a clay gun. I did both to share this lesson. But I have weak hands and find the clay gun difficult to use most of the time unless the clay is really soft. ( I loose patience before this.) My son's on the other hand love (as most of my teen students) using the clay gun for anything the make. 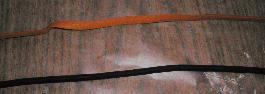 One black round snake and one light brown triangle After softing/conditioning the clay for a long time, I shot out long clay triangle snakes to build my cane. One small round cane and three light brown triangle shapes. I place one triangle shape around the round one and smooth to a single triangle shape with the black totally covered. 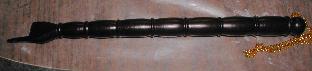 Wooden yad I used under my clay. 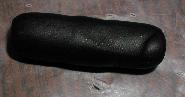 Black thick clay log. If you don't want to use the clay gun, soften clay and roll a 1" thick log of black clay. (Or other color for your center. Clay clear plastic rolling pin on the light brown clay. Some people own pasta machines for rolling sheets of clay but if you don't this roller is great. I rolled a thick sheet of light brown long enought to go around the black log.  Long triangle cane. Using my fingers I pinched a "corner" the lenght of the cane. Making sure the bottom of the cane was now flat. I cut the long cane into 4 even pieces. I rolled the neon colors into thick sheets (about 1/4") and covered the light brown triangle canes. I used neon green, orange, yellow and purple. 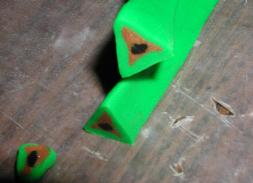 Cutting thin slices using the clay slicer, I cut the canes into thin slices. (About 1/8" or less.) Alternating the colors I gently pressed them onto the wood form. I made sure to not cover the hole for the chain. (I was lazy and baked it with the chain on being careful to not have it touch the clay.) I rolled the yad in my hand to smooth out the shape as the cane slices were not always the same thickness. For one of the yads I made a three corner hat and decorated it to look somewhat like a king's crown. You can add an type of crown to make it sillier or any other shape you want to put on the top. You can also personalize it with your name using a clay snake to "write" your name or put a square piece of clay in white etc. that you can use a permanent marker on after the clay is baked. I liked the feel of the clay so I did not glaze as you do with many clay projects.  Aluminum foil frame for yad. Rolling a large sheet of foil, I pressed it tight to the thickness I wanted. Remembering the clay will really add thickness. I twisted the end to resemble a hand and made it pointy at the end for the pointed finger.  Clay sharp pointer tool. I use this tool to scratch names into clay for labeling purposes but used it this time to poke a whole through the foil near the top of the end of the yad where a chain can be added after baking. 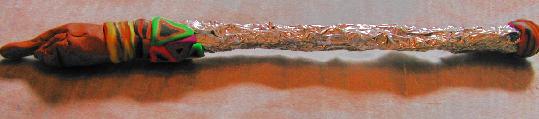 Covering the frame. Using more of the light brown clay I rolled a sheet and covered the hand part of the frame. Using the pointy tool, I scratched the "fingers" into the clay. Using scrapes of the clay from the ends of canes etc. I rolled multicolor snakes and wrapped over the "cuff" of the hand and then the end of the yad. I placed canes over the rest of the yad as on the other yads. Using the pointy tool again I poked a through the clay were the hole was in the form, cleaning out the hole. I rolled the yad gently in my hands to smooth the clay and to make sure the odd cut slices are evenned out. I baked all of them for about 30 minutes at the temperature the clay companies suggests. This may look complicated but for anyone that has done polymer clay cane projects it is not. But for others, you can do it too! Hag Purim, Y'all
To see how to make cane slices and use Polymer Clay see my clay lessons. |