Chadis Crafts' Fun Pages Presents:
Eileen's Camp Crafts'
Clay Mezuzahs

LEVEL: Preschool to Adult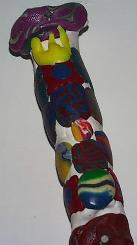 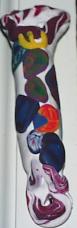
Mezuzahs Made by 3-10 year olds.
Polymer Clay (SCULPEY BRAND) can be used to cover a variety of items:
wood,
glass, metal, pens and more. See my Clay page and my
Picture Page for
general lessons and ideas for using Polymer Clay. To see Jewish clay jewelry
see Eileen's Clay Mezzuzah Charms and Clay
Hebrew Name Necklaces.

Terra Cotta Sculpey Clay
Mezuzzahs
I taught only two days at camp this summer!
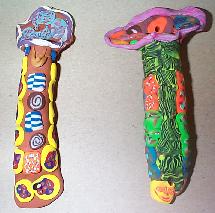
These pictures
are only some of the 65 mezuzahs we made!
We used the bulk clay in terra
cotta color of Sculpey for the base.
We decorated with regular cane
slices pf Sculpey.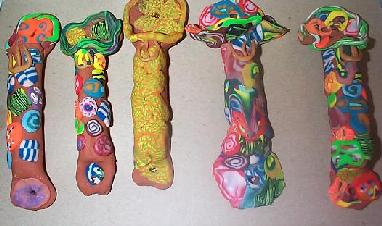
3 & 4 Year Old Camp Class
Teens and Pre Teens
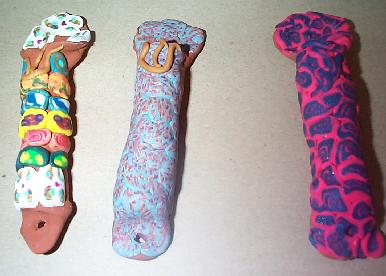
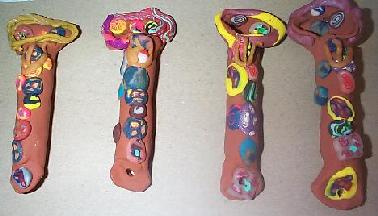
10 Year Olds.
One on right was
made by non Jewish Student.
She will put a strong magnet on the back for a pencil
holder on the fridge
SUPPLIES:
I taught 4 group
to make 65 mezuzahs.
I used 2 boxes (3 1/2 pounds total) of the Terra
Cotta Sculpey (or white Sculpey in boxes).
For the decorations I managed to
use less than 40 ounces of clay.
I usually buy the 30 piece sampler to get
30 colors! (30 0z per box)
More colored clay would be used if you decorate
the entire object front and back.
We mainly did only a few slices and snakes
on the front only.
Mezuzahs, Mezzuzahs,
MezuzzahsA mezuzah is the object used by Jewish people to mark their
door jams.
It includes a prayer written by a scribe in Hebrew on a parchment.
It is used to mark the Jewish home and protect the people in side.
(Remember in
the movie the Ten Commandments they mark the door frame with blood to keep the
spirit of death away from the house?)
Many Jews mark all doors in a house they
live in : kitchen, bedroom, office , den etc.
Therefore, they need lots of
mezuzahs.
Others only mark the outside door.
Mezuzahs can be made of ceramics,
wood, metal, glass, clay etc.
Teacher Preperations
Each year parents ask me to make more mezzuzahs. I found a
copper tube about 4 inches long in a recyle hardware store. Any solid object
with a diameter of 3/4 - 1 inch is ok. The form gives children a hard work
service.
This helps the children so they don't collapse the project when working on it. We wrap it with
aluminum foil making sure that
the ends are left open.
This allows the rod to slip out before
baking.
We use the bulk boxed
white sculpey
This is more cost effective when you are making 100.
Or the bulk
Terra Cotta color Sculpey that comes in a 1 3/4 pound box.
Or bigger if you
order the 24 pound box though Dick Blick We roll a sheet of
clay out either by hand or using a pasta machine. Teachers can either do this
before class
or have the children help you with the pasta machine. Have them play/soften the clay. When clay is soften, roll through a pasta
machine on the #1 setting
or roll flat sheets about 1/4 inch thick. Children
love taking turns turning the handle of the pasta machine.
Wrap the
sheet of clay around form. Shape the clay as desired, leaving the top with an
opening and the bottom closed. Put a whole in the top and bottom to allow for
the mezuzah to be hung on nails. The form can be decorated in any manner you
wish.
|
Directions for organizing class and decorating:
This can be done in 1 or two classes. One to soften the white
(or colored) clay for the form or for the canes.
Second day to make or decorate the form. I usually taught about 4 or 5
classes a day. Each class does a part the first day.
Younger children
softening/playing with the clay and rolling sheets through the pasta.
The older
making jelly roll canes or other patterns. The teacher's or aides taking the
sheets and covering the form on the first day. The second day before or
during classes cutting the canes onto wax paper covered cookie sheets for each
table to share. All classes get an assortment of most canes.
Give each child a piece of wax paper to give them a clean surface to use and to
keep your table free of any chemicals.I like to have them wash their hands
before and after each clay project. (Either at a sink or using handy wipes)
Make sure to mark the childs name gently with a pointed object or tooth
pick on the back of the mezuzah. Children often forget what their project
looked like.
Decorate using canes and snakes.
In the pictures on this page, we used cane slices and twisted snakes.
When little children, I cut them and helped them decide which colors and slices to
put on. Depending on your budget you could put on a few or many
slices. Make two snakes. Twist together and apply to edge. Roll out a little
clay to put the Hebrew Letter Shin (Represents G-d's name.)on the top. Use
tool to make a hole on the top and on the bottom for hanging. Bake as
directed. When cooled coat with Sculpey Gloss/Satin Clear Protection. (Or
protect the clay with Future Floor Wax.)
Canes and Snakes:Directions for making
clay canes and slices made from canes can be found on my clay
page.Pictures of mezuzahs that I make for sale can be seen at Chadis
Crafts. Although these designs are copyprotected they are still a good place
to get ideas for your own designs.
|