Chadis Crafts' Fun Pages Presents:
Eileen's Camp Crafts
Clay Covered Electic Light Switch Covers
LEVEL: Preschool to Adult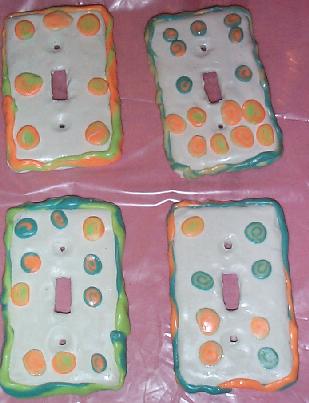 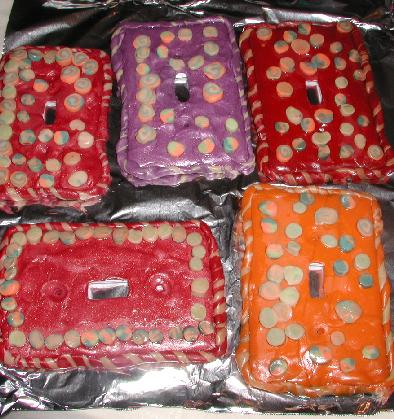
Light Switches Made in Preschool Class Sculpey New Glow in the Dark Clay
Polymer Clay (SCULPEY BRAND) can be used to cover a variety of items: wood,
glass, metal, pens and more. See my Clay page For
general lessons and ideas for using Polymer Clay.
Clay Light
Switch Cover With Cane Slices.Level: Advance
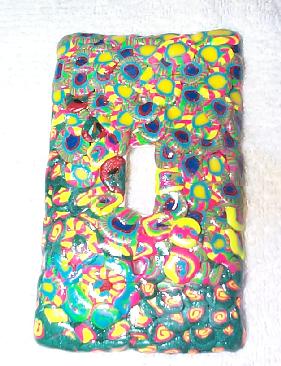 This project uses only cane slices
placed directly on the switch cover. I used similiar colored canes slices to
give the blended look.
Supplies for Glow in the Dark Switch Covers:
Clay Covered Electric Light Switch Plates are available in hardwared stores in
white plastic at a very inexpensive price. (Often around $2.00 a dozen)
Polymer clay can be put onto the Switch Plate directly and baked as directed in
a regular polymer clay project.
In this case I was teaching a class of 3 and 4 year olds, so I kept the designs
simple. Older children can cover the whole thing with fancy clay slices.
White Sculpey (sold in 2 pound boxes) is cheaper than Sculpey 3.
It is also softer to use.
We also used the new Glow in the Dark Sculpey for the decorations. Children
love the idea of Glow in the Dark anything!
The light switch's decorations and border will all glow in the dark to help the
children find the light in the dark!
Directions:
Give each child a piece of wax paper to give them a clean surface to use and to
keep your table free of any chemicals.
Have them play/soften the clay. When clay is soften, roll through a pasta
machine on the #1 setting or roll flat sheets about 1/4 inch thick. Children
love taking turns turning the handle of the pasta machine.
Make sure to mark the childs name with permanet marker on the back of the switch
plate. (children often forget what their project looked like )
Trim the extra clay after covering the top and the sides. Make sure to remove
the clay from the switch hole and the screw holes. I suggest you also use
your finger to indent around the screw holes other wise a longer screw would be
needed than the one given to you at the store.
Decorate using canes and snakes. Or use snakes to write their name.
In the picture on this page, we used jelly roll canes and twisted snakes.
Jelly rolls were just rolling the clay in flat sheets. Laying two or three
different color sheets on top of each other. Trim to a even shape. Roll them
up like a jelly roll. Slice thin. (about 1/4 inch thick) Since these were
little children, I cut them and helped them decide which colors and slices to
put on. Depending on your budget you could put on a few or many
slices. Make two snakes. Twist together and apply to edge. Bake as
directed. When cooled coat with Sculpey Gloss/Satin Clear Protection.
(Or
protect the clay with Future Floor Wax.)
Triple
Light Switch Cover
Covered with Left Over SlicesLevel: Any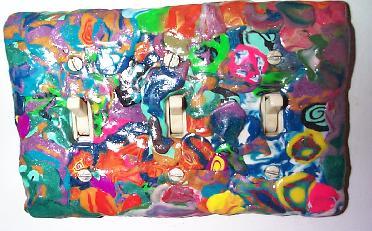
Here is a great way to use up those cane
slices that are left over and possible squished! Micah age 9 took all of my
left over and damaged canes. He pressed them directly onto a triple switch
cover. Blending them to look like a giant marble. Finished off with Sulpey Gloss
for a real great look.
Rubber Stamping on Clay Covered
Light SwitchesRubber Stamping is a great way for the youngest child
to a Senior Citizen to make an interesting light switch. With a little
imagination and almost no talent the project can come out great! Clay can be all one color
or marbelized.
Clay Light Switch Cover with Native
American Stamp DesignsLevel Beginner
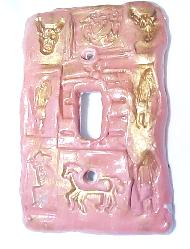 See my Rubber Stamp Projects on Clay For more directions
how to make rubber stamps on clay. See my Rubber Stamp Projects on Clay For more directions
how to make rubber stamps on clay. Clay is rubber stamped with Native American designs.
The rubber stamps were available through a catalog. I think S & S but it was a
long time ago. My son made this a few years ago. Forgot to put the picture on
line!
Supplies:
Plastic Electric Light SwitchSculpey ClayRubber
stampsRollerGold
Powder for claySculpey Gloss or Future Floor WaxPermanet
MarkerClay is rolled
out to about 1/2 thick laid onto the light switch. Mark name on back of Switch
Cover with permanet marker. Trim clay to fit the cover, cutting the
switch openning and the screw holes. The rubber stamps are stamped all over the
clay. The clay is baked per instructions. After it is cooled, either dust the
gold powder on or add to gloss and paint.
| 


 Future
Craft Lesson Pictures
Future
Craft Lesson Pictures