Including: |
    Future
Craft Lesson Pictures Future
Craft Lesson Pictures |
Including: |
|
Future
Craft Lesson Pictures |
|
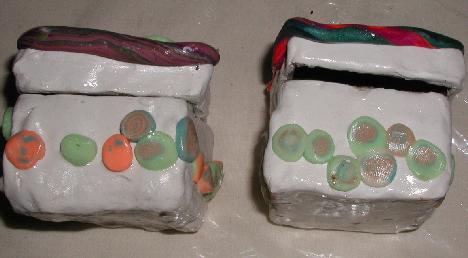
(Formerly Eileen's Camp Crafts) POLYMER CLAY ON PAPER MACHE PAGE 2 To see more projects and full directions for clay on paper mache projects click here to go to page 1.  General directions modified from page 1 Supplies needed: Polymer clay baked on paper mache is a really exciting technique for children and adults. Many commercial paper mache objects can be covered with polymer clay and then baked in the oven. Many are for both decorative and useful items. They come in all sizes from the very small to very large in different shapes including: boxes, pots, bird houses etc For many years our favorite camp crafts have been made from clay. First Salt Clay for home made clay we could make into large objects. Then we discovered Sculpey Polymer Clay! The world of adult looking camp crafts began. I have included some of the directions to clay projects on : Please remember that polymer clay is not play dough and needs adult supervision. Paint with Sobo Craft Glue onto top and bottom of box. Let dry and also cover the insides. This I have been told allows the box to be less porous, adhire to the clay better and protects it. After glue is dried the papermache is ready for your clay. See Eileen's Clay Page for basic polymer clay lessons and ideas. When working with Paper Mache decide what kind of clay techinique you want to use: My favorite technique is using cane slices. Clay rolls/squares can be made by many groups. The teacher then thinly slices them and gives each group or class an assortment. See manufactures suggestions for how thin to slice them. I often slice them 1/4 inch then. I slice them onto sheets of wax paper and then layer sheets inside a covered plastic container. The slices can be used even weeks or months later. When time to share, I take out sheets carefully and place on metal cookie sheets to pass around to students. Students transfer the slices they want onto wax paper they have placed on a foam plate. They then can safely carry back the slices to their table. With little children, I walk around with trays, have them pick their slices and then put them on to their wax paper for them. I also make rules on when they can carefully apply them to their object. Sometimes having younger children wait for teacher or aide to help place them. This cuts down on the children squishing the tiles/slices too flat. I like using multiple canes especially with children but many great and beautiful projects can be made with all of the slices are the same pattern. It is just up to you. Many times I allow the children to take a limited amount of slices at a time. This helps prevent them taking too many for their project and protects the slices from abuse. Slices should be placed next to each other and touching with no empty spaces. When finished covering, roll gently with brayer on wax paper covered clay to smooth the clay and to allow for even thickness. When applying clay to something with a cover make sure to try your cover on before baking. Trim the clay neatly at edges to allow the cover to fit back on. I like to bake all projects in a pryrex container covered with parchment paper. This keeps dust, dirt or other substances from touching the clay from other projects. Do not forget as with all clay or craft projects to mark the child's name somewhere on the project. They often do not recognize their finish art work! Also if you also mark the year, parents love to remember how old their child was when they made this treasure. When making a 2 part project make sure to mark both halves. I like to use permanet markers. If baking multiple classes in one day. I mark on parchment paper which class I am baking this helps when it is time to wrap to send home. |
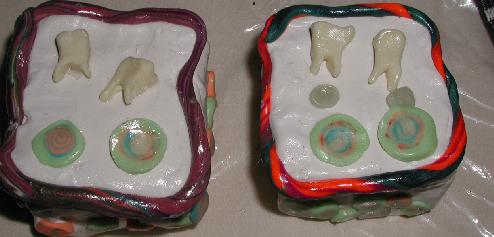
GLOW IN THE DARK
Would work even better with older
children. Project time 1 hour over a couple of days. First to be politically correct, you can call them tooth collection boxes if you don't want to use the tooth fairy theme. I did use some glow in the dark clay to make it easier for the "fairy" to find the teeth. Actually all kids but especially preschool children love glow in the dark anything... beads, clay etc. So I thought it would be great for this theme. Children can be told it is for their parents to use and it glows for them not to loose them. Enough political correctness back to lessons. Supplies specially for this project. The teacher should do apply the sobo glue and let dry the day before this project. Children are given wax paper for a clean work surface and an egg size or larger lump of clay. Allow them to play with it for a while but you should suggest they keep it in one piece. Or they will have fun but make a mess of little pieces that they then loose on the floor. Depending on how much time you want to spend on this, let them play but the white clay softens fast. Have them take a turn putting their clay through the pasta machine. The teacher collects the white clay and lays them out on wax paper near her. Children are then given the glow in the dark clay to soften/play with. I suggest each get only one color so they can't mix them by mistake. While they are softening, teacher can trim the white to cover the boxes. Covering the sides and the bottom. I suggest the teacher does this later and do this project in two days. But if you have a helper and patient children it can be done in one day. White is trimmed for cover to fit on top. Children's name should be marked inside with a permanent marker on both the top and bottom pieces. Collect the glow in the dark clay and hand the children the Sculpey scrape clay give them a ball of assorted colors or have them mix colors and roll into snake. While they are making the snake, roll the glow in the dark into sheets and make jelly rolls. Collect the snakes when they are long enough to go around the rim of the top. Again if doing in one day, cut jelly rolls into slices (saving the white for the teeth shape decorations) and place enough for each child on to individual sheets of wax paper. I suggest you do this twice, giving only enough for either the cover or the sides of the box at one time. While they are doing this take a small piece of the white and shape into teeth. I caution the children not to press the cane slices too hard to sqwish them. Pass out two teeth to each child on wax paper or place on their original wax paper. I find it easier to not keep track whose snakes are whose and warn the children they will be sharing the snakes. But if you have time you can place the snake around the edge of the top using their snake. When fully decorated collect the boxes for baking. Follow the full directions from page 1 etc for baking. When baked and cooled, teacher should apply the glaze and let dry. |