Chadis Crafts' Fun Pages
BABY FOOD JAR CRAFTS
Associated Press Announces
Gerber Baby Food is Switching
To Plastic Containers
From Glass.
Gerber Baby Food is switching to plastic containers
from glass. So collect all you can from this and other baby food companies!
Company says parents prefer the
plastic. We crafters will have to be more creative and come up with a uses for
plastic containers. See my clay on plastic
drinkable Yogurt
bottles that Dannon uses for some crafts with plastic. (So far I am using white
opaque plastic only.) I was interviewed by the
Associated Press and CBS New Radio about the changes. (But quoted in a very
limited format.) I explained how many schools,
sunday schools, camps and scouts used the glass for very professional looking
crafts. The free and easy to collect bottles greatly stretched limited
budgets. They are also great to store as they clean so easily both the metal lid
and the glass jar. But we all understand
the companies reasoning. Less breakage on the store and home shelf. We will
just have to be a little more creative and move to larger bottles with lids:
Sauce, pickle jars, etc!
BABY FOOD JAR CRAFTS
Preschools, Camps, Sunday Schools, Scouts and others all try to use recycled
materials where ever possible. One such recyclable I highly recommend is
baby food jars. The jars of most brands I have come across are made of thick
glass and can withstand microwave ovens. This makes them sturdy for little
hands to use and heat resistant enough to be used in some crafts that need
to be baked in the oven. It is amazing how easy and quick they can accumulate.
I announce to my campers that I need some and in a few weeks I usually have
100 or more brought in to my class. Announcements in Church, Temple and
school bulletins will often bring results in a few weeks. Make sure to say
you want the lids. The labels can be easily ripped off without soaking.
Some craft uses for them are simple such as: paint jars, bead and small
object containers. The craft uses are endless. Projects I have seen them
used for include: spice jars, sand art, crystal wax layered candles, tooth
fair jars, snow/sparkle globes, macaroni art jars, tissue paper decopage
vases, glass stained vases and jewelry jars. The lids have been filled tiles
for coasters. See my camp crafts for pictures of clay crafts using baby
food jars. One of my most popular projects was a clay covered jar. We later
filled with spices to be used in the Jewish ceremony of Havdalah. ( The
ceremony to end the Shabbat that welcomes the new week with the sweet smell
of spices.)  To see other Havdallah boxes, check out my To see other Havdallah boxes, check out my
Polymer Clay on Paper Mache Havdallah
Box.
Plus I just added more to my
Clay on Glass Pages.
GENERAL HINTS FOR TEACHING LARGE CLASSES:
- Give each child a foam plate with their name labeled in permanent marker.
It helps label projects in progress.
- Cover with paper towel for sand, glitter, crystal wax projects. It
catches extras that can be recycled.
- Give each child a piece of wax paper to work their clay on to keep
their clay clean.
- Label with initials or names every project as you take them away from
the children. Don't expect to remember who made something and most children
will forget what their project looks like. Use permanent marker on the
bottle of glass jars and lids before you give them to a child.
- When using sand or wax crystals work one color at a time for the whole
class. If possible help them lift their jars after each color to recycle
the spills. If not at the end dump all into a multicolor collection bowl.
The multicolor can be used in another project or as a layer in the project.
| DIRECTIONS FOR BABY FOOD JAR CRAFTS:
- SNOW GLOBES- Snow globes can be made with sparkles, metallic
confetti and other non melting objects. Children love picking out different
objects to put in their globe. The different shape metallic confetti is
the most popular. Fill the jar to the top with water and cover tightly.
Many craft books show globes be made in soda bottles and other objects
but they use corn syrup instead of water. I have not tried it yet but it
looks like fun.

- Sculpey
Poymer Clay Website has a great project
called Mother's Day Snow
Globes.
Clay Covered Bottles and Lids. Cane method of
decorations.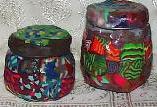
- CLAY COVERED JARS- Colored Sculpey Clay cane slices can be placed
on to the jars to cover the entire bottle. The top and sides of the jar
cover can also be covered with clay. Make sure to trim the rims of both
so the lid will still fit on after baking. When working with a class I
use a metal pointed clay tool ( or any other thin pointed object) to lightly
carve the child's initials into the clay for identification. Most children
will forget what their project looks like. Also label the inside of the
lid with a permanent marker. Make sure to check the bottom of the jar that
the clay still allows the jar to still stand flat. I bake the lids and
bottles separately. My favorite cooking method is to use baking parchment
paper covering the bottom of a Pyrex casserole pan. Remember that once
an object is used to bake clay it should not be used for food. I tend to
do messy projects in my pans so the parchment keeps the clay clean. After
the clay cools glaze with Sculpey glaze of your choice : Gloss, Matte etc.
Or for a cheap matte finish use Johnson Future Floor wax applied with a
paper towel or a brush. This ads a protective acrylic seal.(See my Clay
Page for how to use Sculpey.)
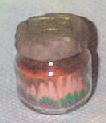
- CLAY COVERED LIDS- Lids can be covered with clay for a variety
of projects. 3 D sculptures are limitless. One of the easiest projects
is to give the children a few scrapes of different color Sculpey clay for
them to roll together for marbleizing. Take a stamp ( we use the rubber
stamps sold for Friendly Plastic and Sculpey which is available in flowers,
geometric, Native American motifs and more.) Press gently into the clay.
Make sure to trim the lid so the cover will still fit on the bottle. Bake
and glaze. (SEE PICTURE BELOW.) Or you can cover with cane slices. ( see
pictures of jars above.)
- TOOTH FAIRY JARS- Cover the top and side of the lid of a baby
food jar with Sculpey clay. Make sure to trim the edges to allow the lid
to sit back on the jar. Use one color of clay, multicolor ( marbleized)
or use cane slices. ( See my Clay Page for directions for Sculpey) Use
a white clay to make a large tooth. Press gently to make it stick to the
clay on the lid. Label the inside of the lid with the child's name or initials
using a permanent marker. Bake the lid. When the clay cools, glaze the
cover. (see above) Using a permanent marker decorate the jar with the child's
name. For example: Micah's Teeth.
Sand Art with Clay Covered
Lid. Stamped design.
Wax Crystal Candle with
solid wax poured on top to seal.
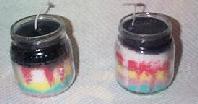
- SAND ART/CRYSTAL WAX CANDLES- Give each child a plate. Cover
with a paper towel to allow recycling of materials. Work one color at a
time with the entire class. Make each layer at least 1/2 inch. If using
sand layer up to the top so when cover is placed on their is less
room to allow the colors to mix. ( Depending on what shape the jar is there
still may be an air space after the lid is placed on. Caution against unnecessary
tipping.) Tap lightly to allow settling before covering with lid for sand
art. At any point use a tooth pick or a bamboo stick and push stripes around
the outside of the sand/wax to add designs. The lid for sand art can be
left plain or decorate. For wax crystals buy wick with wire core
and place in metal wick holder. Place in center of jar and start adding
crystals in layers like sand art. fill to at least 1/2 to 1" from
the top. Take from the children carefully bring them to the kitchen or
hot plate where over a double boiler block wax is melted with a color and
scent. Fill to top with melted wax. Watch after some cooling to fill in
any depressions. Check directions from company on other methods of sealing
jar.
HALLOWEEN CANDY JARS by Lory Garcia
(with
permission)
 Lory was a parent
volunteer in her 1st graders class at Holy Rosary Academy in Nashville, TN.
She used Sulpey Clay to cover baby food jars lids. She had some pvc pipe and
copper pipping left over from her husband's projects that she used as rolling
pins. She asked McDonalds for some plastic knives, as they are smoooth. She
used two colors orange (sweet potato) and black. Some kids just made round balls and squished
them to make the face. She took them home to bake and sprayed them with
acryllic spray, after they cooled, for shine. She filled them with candy.
She and the project were a hit. Thanks Lory for letting me show your work and your picture. Do
you have a craft and picture you want to share? Email me.
|